
2. Onboarding tool Asana

A successful onboarding journey requires organised communications

In the heart of our customer onboarding is a trusted onboarding tool Asana. This robust platform is employed to efficiently guide the customer through the implementation journey and store all essential project steps and materials. Within Asana, you’ll find all the tasks you’ll be completing independently, tasks that Sympa will handle, as well as our shared checkpoints and other online meetings. Asana is our collaborative platform, so I encourage you to actively participate there!

On this page, we guide you through all the key elements of the onboarding tool. We hope you find it helpful!

Privacy and data security

As part of our commitment to data protection and privacy, Asana exclusively captures and retains only two essential pieces of information about the customer: the customer’’s name and email address. All data is stored in data center located in EU. This approach ensures data minimisation and security, allowing us to focus on the core elements necessary for a successful onboarding experience!

With Asana, your project data is not only organised and accessible but also well-protected, aligning with our dedication to privacy and compliance with data protection regulations.

Please be aware that employee data should not be shared in Asana or via email! Documents containing employee data, such as data import files, should be transmitted through your own Sympa. We will provide further instructions on this in Asana

A guide to the onboarding tool Asana

asana-login

1 Access to Asana

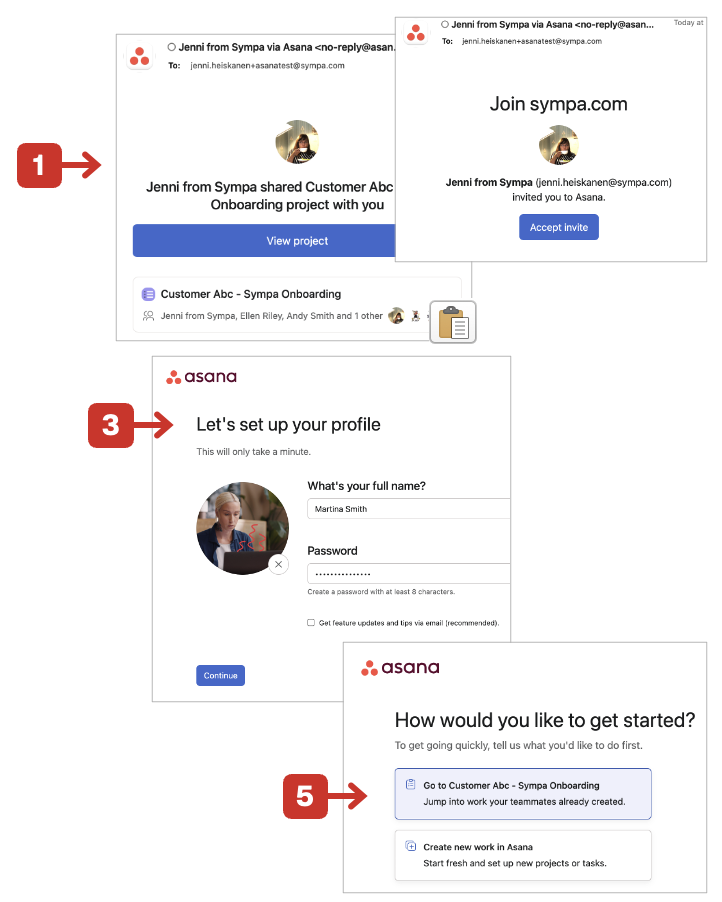
  1. Getting Your Invitation: You’ll get an invite from no-reply(at)asana.com before your first online checkpoint with Sympa.
  2. Logging In: Just click the blue ‘View project’ or ‘Accept invite’ button to get to the login page.
  3. Setting Up: Agree to the terms, then create your username and password.
  4. Desktop App (Optional): Feel free to download the desktop app, or you can just skip this step and stick with your browser.
  5. All Set: And that’s it, you’re in!

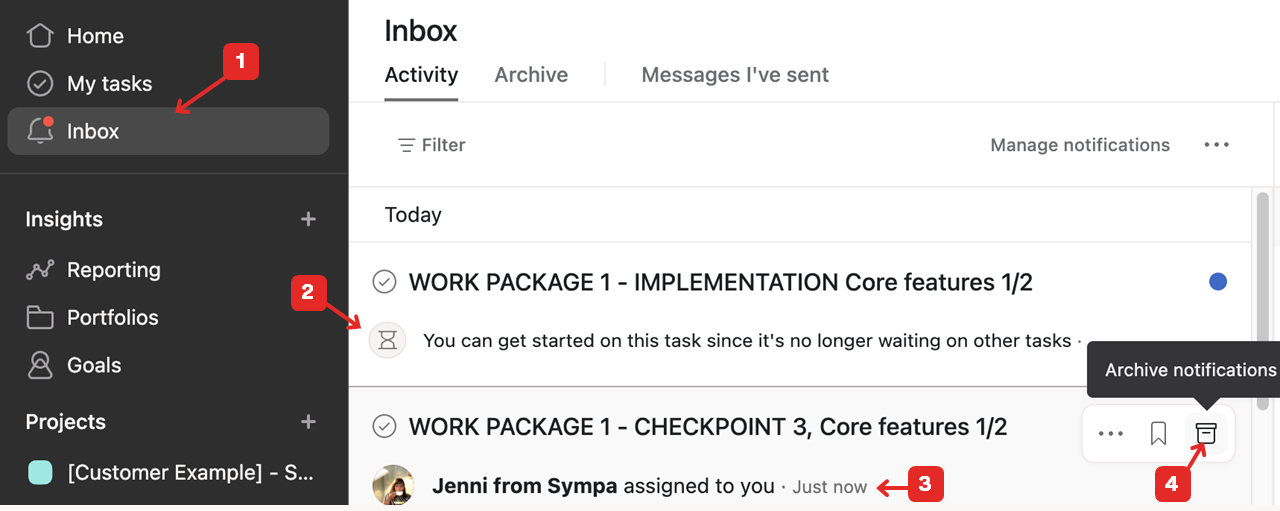
Please note that you’ll receive several notifications from Asana when a batch of tasks for each phase is assigned to you. Don’t worry! You’ll be able to see all the tasks in Asana. We recommend keeping an eye on the notifications that come through between these phase assignments

2 Navigation

  1. Introductory Video: Watch a short video to get familiar with Asana’s different elements: Navigation in Asana
  2. Your Unique View: Check out the image provided to understand what makes your view in Asana special.
    1. Menu: Easily show or hide the menu as needed.
    2. Inbox: Take a peek at recent updates. You might find some tasks waiting for your action.
    3. Your Onboarding Path: This view includes everything you need: all the tasks and a comprehensive guide to smoothly steer you through the onboarding process.
    4. All Incomplete Tasks: Quickly view any tasks you still need to wrap up.
    5. All Tasks List and Board: Here, you can see all the tasks  in the onboarding process, also the completed ones. Just choose List or Board view.
    6. Calendar: Get better understanding of next due dates in the calendar view.

.

asana-visualisation-onboarding

3 Onboarding phases and board view


In any of the main views (items 4-5 in the previous image), you’ll notice the onboarding process is organised into different phases, represented as sections. In board view you’ll progress from left to right through these phases. Each task within a phase appears as a card, making it easy to track your progress through the onboarding journey.


asana-board-view

4 List view


  1. Prefer a list format? No problem! You can switch to the list view of the phases and tasks from the top bar.
  2. The small arrow and branch icon tells that the task has subtasks. Click either arrow or branch icon to open the subtasks.
asana-list-view

5 Notifications

Stay Updated via Email: For every notification, you’ll receive an email with direct links to Asana. This keeps you in the loop effortlessly.

Check Asana Inbox: Alternatively, you can track updates right in Asana’s Inbox.


  1. Check Asana Inbox:Just open the inbox from the left-hand menu and catch up on all your unread messages.
  2. Task Updates: Look out for the hourglass symbol in notifications – it means a task is no longer blocked by others. Simply click on the task and get going!
  3. New Task Alerts: Whenever a new task is assigned to you, you’ll get a notification, keeping you informed.
  4. Managing Notifications: After dealing with a notification, feel free to archive it to keep your inbox tidy.
asana-notifications
asana-task-status

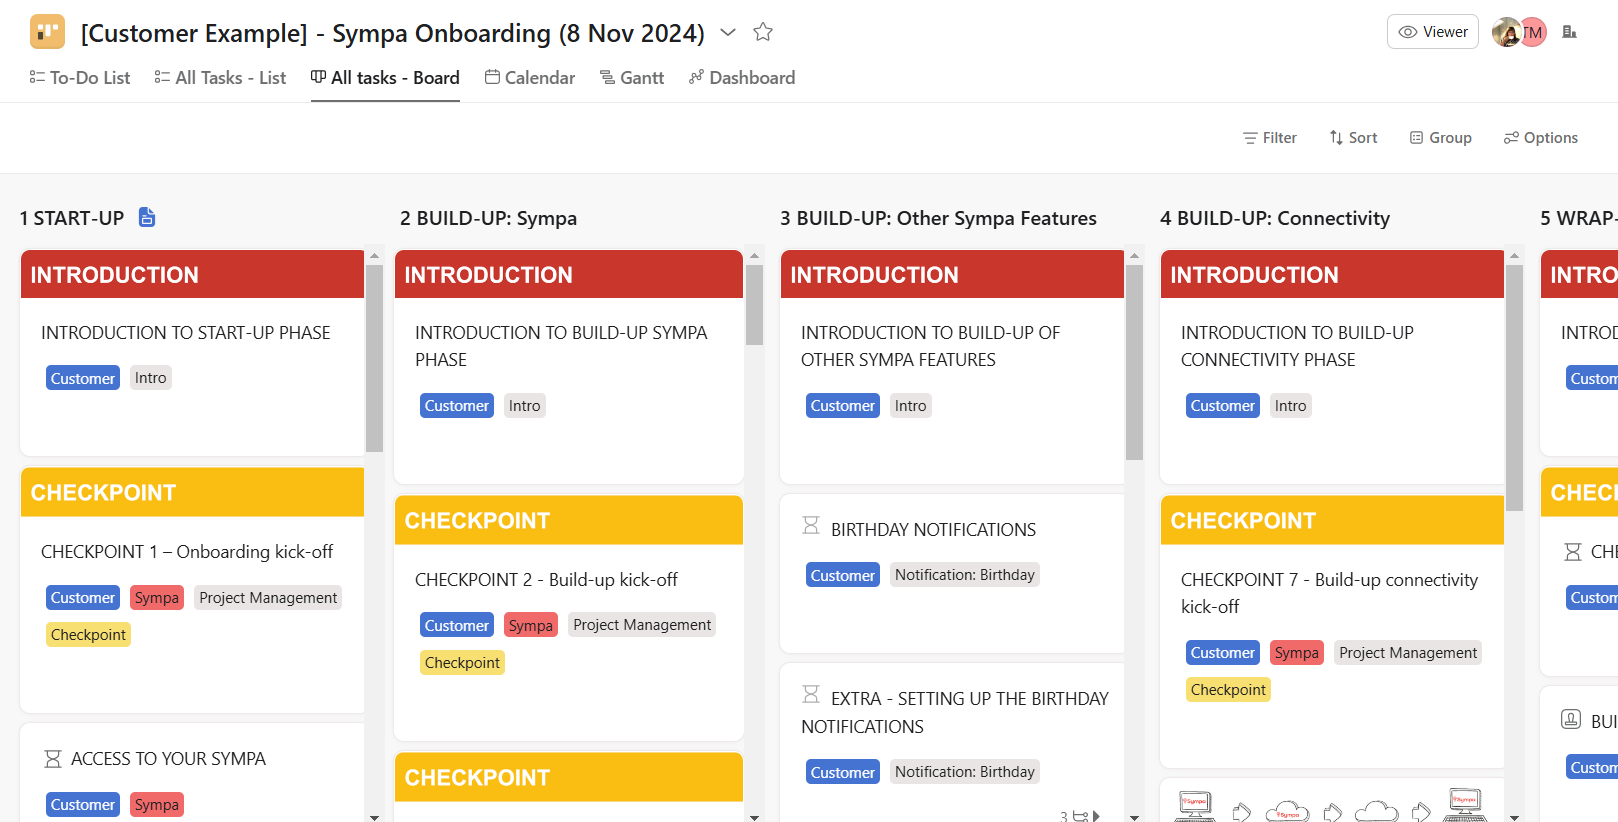
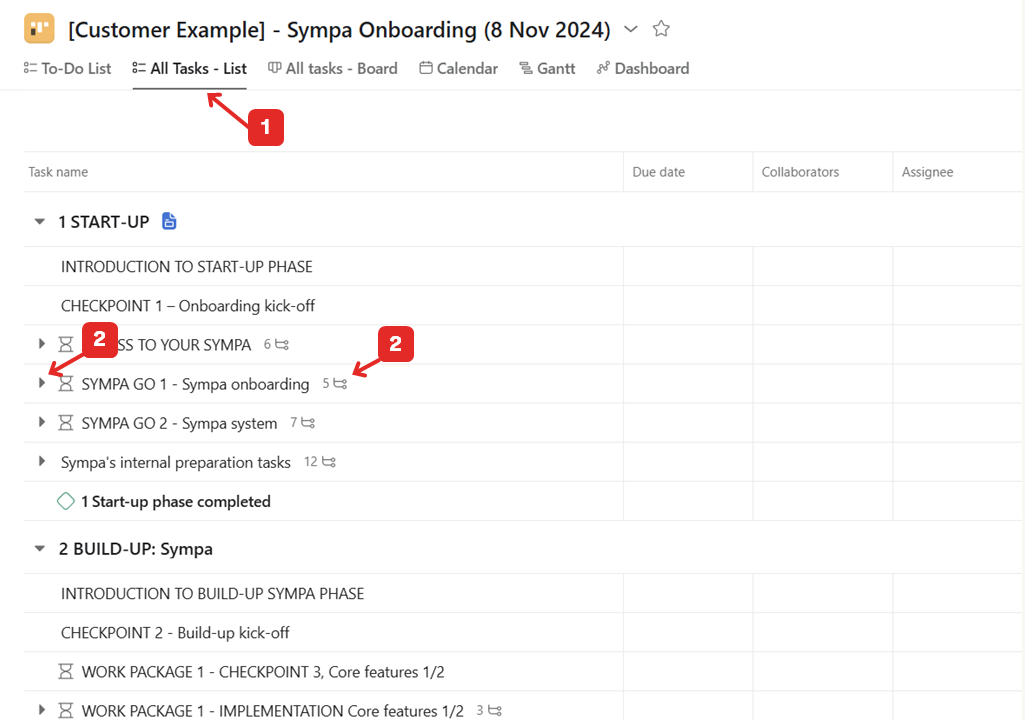
6. Which tasks are for me?

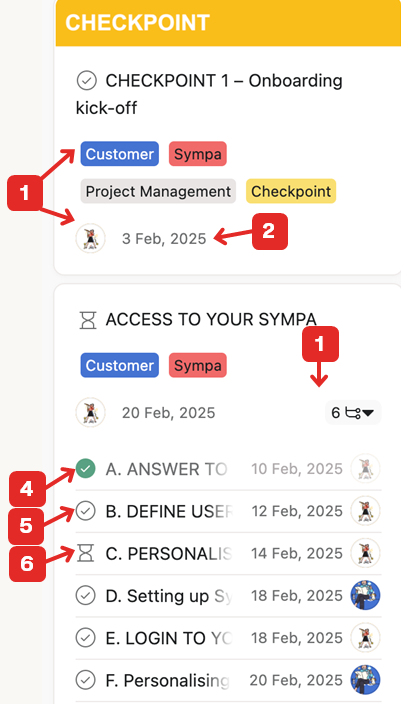
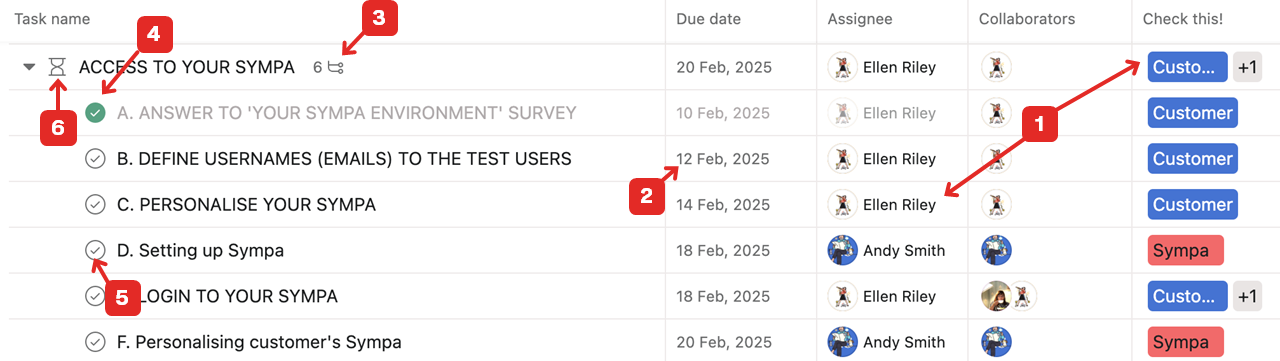
  1. Spot Your Tasks Easily: Your tasks are marked with a blue ‘Customer’ tag. Plus, you’ll see your user icon or image, indicating you’re the assignee.
  2. Due Dates: Each task comes with a due date, helping you track deadlines.
  3. Subtasks Insights: Many tasks include subtasks. Some are for you, and others for Sympa. Just focus on the subtasks assigned to you.
  4. Task Completion: Completed tasks? You’ll know them by the green checkmark.
  5. Open Tasks: Tasks yet to be done don’t have any icon.
  6. Blocked Tasks: These are marked with an hourglass icon. You can only start on these tasks once the preceding tasks are completed.

Same in list view

asana-task-list-view
asana-task-content-1

7 Completing a task

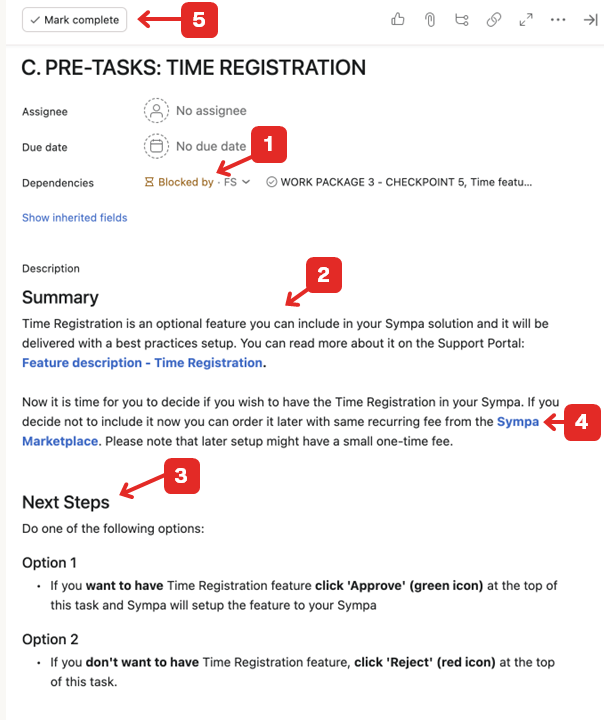
  1. Check for Blocks: Before diving in, make sure the task isn’t blocked by another. If you see ‘Blocked by’ in brown text, this will direct you to the task that’s holding you up. (‘Blocking’ in red text indicates this task must be completed before you can move on to another one.)
  2. Read the Description: Take a moment to thoroughly read the task description. It’s packed with useful info to help you.
  3. Follow the Next Steps: Pay attention to the steps outlined in the task. They’re your roadmap to completion.
  4. Look for Links: Keep an eye out for blue links. They might lead to extra information or to a survey you need to complete as part of the task.
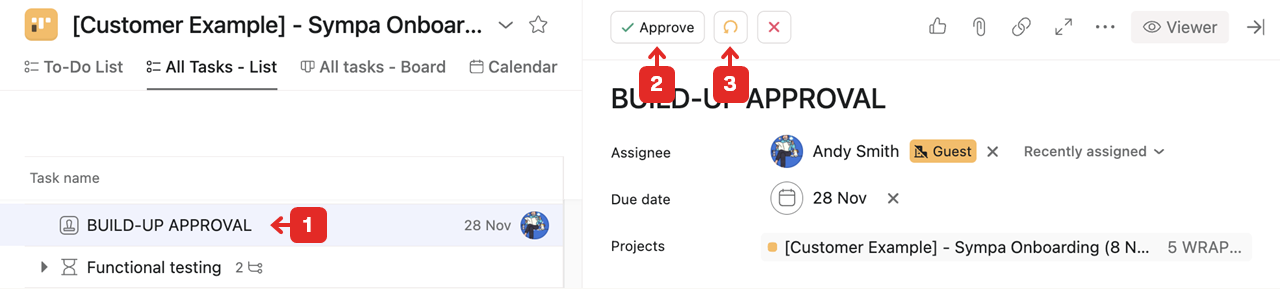
  5. Mark as Completed: Once you’ve tackled everything, go ahead and mark the task as completed from the top bar.

8 Approvals in Asana

Approvals play a key role in your Sympa Onboarding. It is important that we confirm different steps are ready and delivered as agreed before moving on to the next tasks.

  1. Recognise an approval task: You can recognise an approval task by the stamp icon and the three different action options instead of ‘Complete’.
  2. Approving: When you agree with the suggested solution, select ‘Approve’.
  3. Requesting changes: If you disagree with the suggested solution, please add your comments to the task and select ‘Request changes’. Sympa will then review the topic and initiate another round of approvals
approvals-asana

9 Contacting Sympa

All our meeting points are dedicated to sharing feedback and questions. In addition to those, you can contact Sympa through Asana. You have two ways of doing this:

1. Add a comment to the task: If you have a question or comment related to a certain task, simply write in the Comments section at the bottom of the task.


comment-in-asana

2. Send a message: You can also send a message to your Sympa experts. Add a clear topic, select the receiver, and type your message.


message-asana

3. Check the reply: When we reply to you, you will receive a notification in your email and in your Asana Inbox, where you can continue the communication and access the task in case you were commenting on a task.


answer-comment-asana